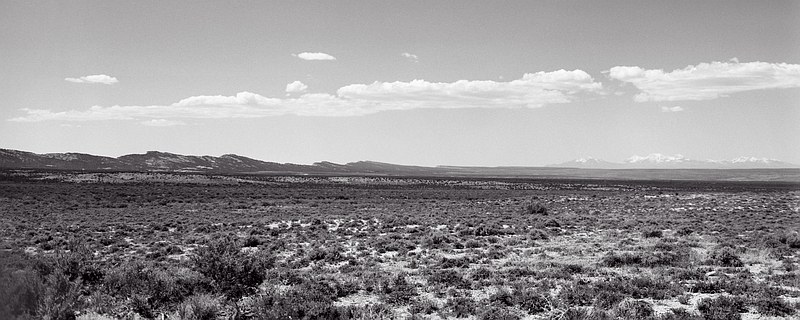
Line of Clouds, Colorado/Utah border. Abajo Mountains in distance.
Schneider-Kreuznach Super-Symmar 5.6/110 XL-105° lens; AgfaPan
100 film with Wratten #15 deep yellow filter, developed in Rodinal.
The book Using the View Camera by Steve Simmons (Revised Edition, 1987;
Amphoto, New York) also gets high marks from many in LF photography, but I've
never seen a copy.
A good Ansel Adams tip was to make and use a simple cutout card held in front of
the face to first compose the image by eye right side up, and then note where the
desired edges and/or corners are, or what is on-center. This acts as both a
compositional aid and scene analyzer, but it can also help determine exactly
where to set the tripod up, and maybe also what lens to use (from how close the
card is held to the eye - the closer, the wider the angle of lens needed). Playing
around with this is a good exercise in noting how small changes in camera position
can alter relative perspective of nearer-by objects and slightly/subtly rearrange
components of the image.
You want a minimum sized cutout of 4"x5" in an ~8"x10" card (black on one side and
white on the other is best), which with a normal focal length lens of F.L. ~6" will
need to be held about that same distance (6") from the eye to frame the field of
view properly. That distance will be even less for shorter F.L.'s, so a 6"x7½"
cutout in maybe a 9"x 11" card would be better. At times I've thought of inscribing
lines on a piece of plexiglass, and trying that as a variation on the same idea,
but have never gotten around to doing it.
As an additional aid for B&W, Kodak had a dark greenish-amber Wratten #90 filter
which visually mutes colors sufficiently so one could partially "see in B&W", so
far as this is possible, by looking through it (not using it on the camera). It
saved me the trouble of making a lot of not-so-good photos, while educating me over
time what subject matter translates best into B&W. If certain image components look
darker or lighter through the filter than expected or desired, it may also suggest
filters to use on the camera during exposure to change their tonal values as desired.
I'm not sure if #90 filters are still around, so it might be a rare find if you run
across one. You should mount it in some sort of sturdy holder (like a big slide
mount) so you can handle it without damage, since the gel filters themselves are
flimsy and fragile.
One other note: if you're much past forty years old and/or need reading glasses
to see things up close, especially under dimmer light, you'll likely find you
need a strong pair to be able to focus at the ~5-6" distance of the ground
glass under the darkcloth of a LF camera. A small (~2" diameter) magnifying
glass, I've found, is essential when focusing the camera. Mine is strung on
a length of light picture hanging wire attached to the camera so it's always
right at hand. It folds up into its protective case, the outside of which I've
glued or taped a small piece of mirror to; this is so I can see the bubble
levels on the top of the camera back without needing a step stool when the
camera height is too much to be able to see them even tippy-toe, which tends
to be the case when the center of the ground glass is at or near eye level,
where it's the most comfortable to work when on level ground.
My 15" laptop has only a 1 MP display, and I don't think even the highest
resolution office displays are much above 2½-3 MP. That is basically
just a tiny thumbnail image for a 100 MP original LF scan.
If an even smaller "catalog" image of maybe only ~½ MP (600x850) is
what's being displayed, the medium mismatch is even more severe. All of
what I call the stupendous information richness inherent in the medium
of LF film photography can be lost in the huge downward compression
needed to fit it into the relatively tiny peephole of the everyday
digital universe, to the detriment of the medium. In other words, LF
won't make your work instantly look better on small digital displays.
Even 35mm film or APS-C digital can be overkill when paperless media are
the principle means by which people are viewing your work. Depending on
what you're doing, there may be no real point in going with large format
except as a broadening and learning auxilliary experience. There are
things you can do with LF which are impossible to do with other cameras,
but they won't necessarily be immediately apparent at low resolution.
Where large format is at its best IME is in making large prints. A 16"x20"
print, whether made analog or digital style, is only about a 4x enlargement
of the original negative or slide, which would be comparable to a postcard
sized (4"x6") enlargement from 35mm film or common amateur digital formats,
roughly speaking. For these, a 16"x20" print would be an ~15x enlargement,
about the upper limit beyond which graininess and inherent sharpness
limitations in the lens become apparent even for a carefully made photo
using quality equipment, since at some point one merely enlarges the blur.
Remember, a 12x enlargement for 4"x5" is about 4x5 *feet*.
A technical explanation and somewhat lengthy discussion to make all this as
clear as possible follows...
At a scan resolution of 2400 DPI, my 4x5 based digital images start out at
about 9,000 x 11,400 pixels, which is just less than 100 MP. This is a
10.6 micron pixel size on the film, and this is sufficient to extract
almost all the information in the original negative or slide which was
made with regular films and lenses.
This is a scan resolution of 90+ pixels/mm. If you're familiar with sampling
theory (and the Nyquist limit), you'll know this is sufficient to resolve a
maximum of half as many spatial cycles or line pairs per millimeter, 40-45
cycles per millimeter in this case. This is good enough to exploit the
approximate maximum resolving power of regular films with most lenses that
produce a decent image on the ground glass.
Though it depends on the subject contrast, film, development, etc., if you've
looked at film technical specs you might have seen what's called the Modulation
Transfer Function (MTF), which charts this film property. The generic curve for
many regular modern films is falling pretty rapidly by the 40-50 cycles per mm
area, meaning the film's ability to fully resolve such fine detail (and finer)
is pooping out. It does record it some, but at a much lower (and falling)
contrast. The MTF is usually given as a percentage of the input contrast,
and it's an arbitrary choice as to what low percentage it has to fall to
before the film's ability is effectively exhausted.
Because resolution in a chain of components adds reciprocally in quadrature,
if a 45 cycle/mm capable lens is used with 45 cycle/mm film, you get an
output with ~32 cycles/mm resolution when the two are used together. A
sixty-fourth of a millimeter is 15.6 microns, so this is within the
capabilities of the scanner (10.6 micron pixels) to resolve. This may
sound very coarse compared to modern silicon sensors with 150-175 pixels
(~6 micron) up to 500 (2 micron) or more pixels per mm, but if you've
ever seen an Ansel Adams print at an exhibition you know that great work
can be done in the 25-40 cycles/mm regime. This is because you have so
many square millimeters of silver real estate at your disposal. (-More
than 100 sq.cm's, ~115 to be exact, each one of which has about as much
information -- a little less than a MP -- as an HD video still frame.)
See Addendum A for more.
Back to regular large format cameras, what can one see on the ground glass
when focusing? If we take the eye's resolving power as being 1-2 arc-minutes,
at 5" (127mm) distance this is 27-13½ per millimeter, which is at best
still just slightly less than the typical lens+film combination is capable
of -- hence the utility of a 2-3x magnifying glass for critical focusing.
When trying to focus only by eye, there should be a small dead zone as you
rack things back and forth where the focus doesn't appear to change much,
and the best you can do is try to hit near the mid-point of it.
The situation changes entirely when the thinking switches to being in terms
of a non-fixed display (print) size. The eye's maximum resolving power
corresponds to 1/1720th to about 1/3500th of a radian; thus, at a typical
reading distance of 14", 1-2 arc-minutes is 1/125th to 1/250th of an inch
(14" divided by 1720 or 3500). Thus a print made at 250 DPI (Dots
per Inch) from a 2400 DPI scan (9.6x) will not show any
pixellation or discreteness effects under even close casual inspection.
Most scans of decent source material can be enlarged to about 15x, or 160
DPI before any deterioration in quality will start to become apparent when
the enlargement is given critical close inspection. At 125 DPI -- pulp
printed material like newspaper photos used to be printed from plates
made with 100-125 lines per inch screens -- an enlargement may look okay
from a distance but upon closer distances will hit a limit within which
getting closer doesn't help.
It takes time to set up and level a tripod, mount and level the camera, attach
the darkcloth, choose and mount the lens, and then get started working with
the image. After that's complete and you're ready to "fix" it, there's the
entire subsequent process of metering the scene and determining an exposure
setting, presuming you already have an idea which film you're going to use,
and possibly which filter, and what your intent in making the exposure is.
Actually inserting a film holder, withdrawing the dark slide, and clicking
off an exposure with the cable release can almost seem incidental. It can
easily go by unnoticed to a casual observer standing nearby. Then there's
the entire camera/tripod disassembly process in reverse. (I'm assuming
you'll be working in the field not the studio.)
Adams uses the term "contemplative" to describe the contrast with the approach
which comes naturally when using small format equipment, but this is maybe not
always the case. There have been plenty of times when I've wanted to go through
the setup/expose process as quickly and efficiently as possible to get a shot
before the light changed or clouds moved, or maybe even the location required
it. In college, I did a cross-country roadtrip in a van with my 4x5; it wasn't
long before a request to stop so I could take a picture would elicit groans.
Most people think taking a picture means jumping out at the view spot, while
leaving the engine running, to take a snapshot proving they'd been there and
seen that, and even though I got so I sometimes could set up, shoot, and tear
down in only ~10 minutes, on that scale LF does take 10-20x longer than a
snapshot.
Often when I'd go out for a shooting session of a few or several hours I might
feel okay about only making some four or five exposures when all was said and
done, and anything up near double that or above was a good haul. When I'd go
out where I could shoot almost all day, ten or a dozen (ok, fifteen) felt like
coming back from fishing with a full creole.
Color slide film is now (c.2015) about $3.50 a sheet and $2.50 to develop,
not to even factor in the time, travel, and equipment investments, so LF
can be at the opposite end of the spectrum in terms of cost-per-shot from
potentially throwaway, quick, operationally almost free, digital
photography.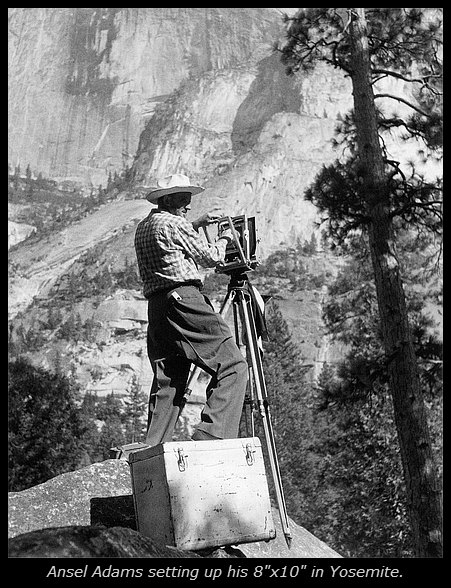 I actually didn't run across this until having done LF (and other)
photography for some half dozen years, but it's been a valuable reference at times
ever since. I learned mostly from Ansel Adams' famed "Basic Photo Series" (of five
books), primarily the first two -- "Camera and Lens" and "The Negative" -- which are
most applicable to LF film photography. The third, "The Print", is relevant even if
you're not interested in printing by light onto the old silver-based papers, as it
contains quite a lot of Adams' philosophy as well as information which is more
or less independent of the medium.
I actually didn't run across this until having done LF (and other)
photography for some half dozen years, but it's been a valuable reference at times
ever since. I learned mostly from Ansel Adams' famed "Basic Photo Series" (of five
books), primarily the first two -- "Camera and Lens" and "The Negative" -- which are
most applicable to LF film photography. The third, "The Print", is relevant even if
you're not interested in printing by light onto the old silver-based papers, as it
contains quite a lot of Adams' philosophy as well as information which is more
or less independent of the medium.
 Ignoring depth of field considerations for the time being, most modern
lenses are capable of this level of resolving power or more, so the film
is typically the limiting factor, but not by a huge amount. IOW, with a
very nice lens you may see more fine detail on the ground glass when
focusing than you'll end up with on the film after it's processed. (It
can depend on how fine your ground glass is.) Don't be disappointed.
Older lenses, say from the post-WWII era up to when computers started
being employed by the late `60s and into the `70s, which resulted in
much better lens designs (like by +50-60% in resolving power), are
typically pretty well-matched to generic film technology of the same
era (i.e., Plus-X, Tri-X). Such lenses may not have much going for them
in terms of image circle size, but at a practical level their sharpness
is sufficient to do lots of good work with.
Ignoring depth of field considerations for the time being, most modern
lenses are capable of this level of resolving power or more, so the film
is typically the limiting factor, but not by a huge amount. IOW, with a
very nice lens you may see more fine detail on the ground glass when
focusing than you'll end up with on the film after it's processed. (It
can depend on how fine your ground glass is.) Don't be disappointed.
Older lenses, say from the post-WWII era up to when computers started
being employed by the late `60s and into the `70s, which resulted in
much better lens designs (like by +50-60% in resolving power), are
typically pretty well-matched to generic film technology of the same
era (i.e., Plus-X, Tri-X). Such lenses may not have much going for them
in terms of image circle size, but at a practical level their sharpness
is sufficient to do lots of good work with.
* - There was someone who I went on a number of hiking and backpacking trips with, a friend who knew my film frugality. He would still remember the time he'd thought I'd gone completely nuts since I was going through almost half a roll of film in about 15-20 minutes. (We were camped at a half-frozen tarn on the tundra in a place that was very difficult to get to, and one evening the sunset colors bouncing off the surrounding mountains and rock cliffs lit the entire place up spectacularly; it was difficult not to see one incredible photo after another, and the light was changing so slowly but steadily that I didn't even want to stop and change lenses.) You have to get while the getting's good sometimes.
First, it's important to realize just how simple the basis is for almost all large format lenses...
Start with a simple lens: ()
Bisect it: (|)
Separate the two plano-convex halves by a small amount: (| |)
And then insert an aperture and shutter into the space: (|¦|)
Voila!
This is the simplest, most elegant design, also known as a symmetrical lens. The basic idea has survived all the way to the present. Even my modern, aspherical element, XL super wide-field lens is a derivative of this design lineage, bearing the trade name Symmar, even though it's technically an asymmetrical design.
The next step in evolution and sophistication was to make each plano-convex lens into an achromatic doublet: ((| ¦ |))
This results in a 4-element lens which works amazingly well at apertures as wide as ~f/4.5-5.6, for normal and portrait focal lengths. It has a relatively wide good field (image circle size at the focal plane), and gives good enough color correction that it could be used with the then new orthochromatic and panchromatic emulsions (and color films). Sometimes a minor 5th element was added to one component to improve one or the other of the common aberrations and/or increase the image circle size a little.
Simple designs of this sort dominated the first half of the film era because they were able to inexpensively provide sharpness comparable to or in excess of what the early LF sheet films were capable of recording. So, many of these lenses and their designs survived into the post-WWII era and up to the era of computer design.
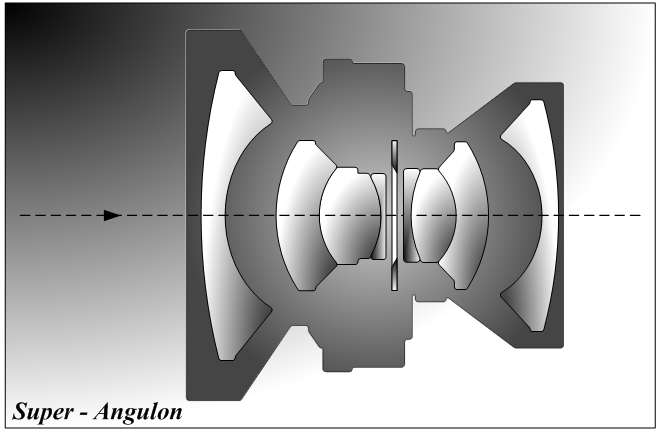
The Super Angulon exhibits its earlier lineage in dual plano-convex
designs.
In considering the properties of the symmetrical design it's sometimes helpful to think in terms of the converging power of a lens, rather than its reciprocal property, the focal length. This is a change in perspective because we usually think of long focal length (telephoto) lenses as being "more powerful" because they produce a larger image. But they can also be thought of the other way around, as having less converging power. The total converging power of a compound lens (two lenses together) is shared equally by both halves in a symmetrical design, each giving half the total converging power. This means they each have a longer focal length as separate elements than together in combination.
In the old symmetrical lens designs you could use either element by itself (usually behind the shutter), essentially giving you two lenses in one, one with a normal-ish focal length, say, and the other with a focal length maybe almost twice as much. By going to a mildly asymmetrical design, one could get three different focal lengths from one lens. In fact, one of Ansel Adams' favorite lenses for his 8"x10" camera was a Cooke Triplet lens which gave three different focal lengths.
By convention a "normal" focal length for a given format is taken to be roughly equal to the length of the diagonal of the format. This condition gives a diagonal angular field of view of about a radian, or 57.3°, from corner to corner. For 4x5 this is Sqrt(41=42+52) = 6.40" or 162.6mm.
The f/4.5 Graflex Optar lens with 6 3/8" focal length would be an (old) example fitting this criteria, in the simple 4-element design category. I have one in a Graphex shutter made by Wollensak (Rochester, NY), and it's a very good lens which I doubt cost me more than $50.
If one takes into account a border or gate for a format, since sheet film needs to be held down by its edges in anything that holds it, or like a slide opening is slightly smaller than the size of the exposed film so the unexposed (clear) edges don't show, the number goes down a little bit. The scanned area of my 4x5's is about 3.7" x 4.7", which works out to a diagonal of almost exactly 6" (152mm). If the typical 1/8" film holder borders are figured in the gate is more like 3¾" x 4¾" Thus many take a 150 mm lens to be a "normal" focal length for 4x5.
When you double every dimension to 8x10, the diagonal doubles also, and so the "normal" focal length goes up to 12-13" (305-330mm). For 35mm film, the number is around 42½mm, depending on the exact dimensions taken (this corresponding to a 23.45 x 35.45 mm's gate, or a roughly ½mm border. An APS-C silicon/digital format camera (~15x22½mm's) works out to 27.0mm, which is actually large compared to some video chip sizes or point-and-shoot camera sensor sizes with 8mm or smaller diagonals.
As an alternative to a "normal" focal length lens, one might first consider a so-called normal-wide lens, one with a slightly shorter focal length. "Slightly" means something like 10-15%. As it turns out, there was a 135mm version of the 6 3/8" Graflex Optar normal lens mentioned above, and this was my first and only lens for the first several years after I got my 4x5, while I was learning the basics. It is 10% shorter than a 150mm lens, and 5/6ths the focal length (17% shorter) than the longer 6 3/8" version. For doing a lot of nature and landscape, as well as for general subject matter, the 135mm was a good, all-purpose way to go. (When I got a second lens it was an even shorter, 90mm, very wide angle lens.) In the slightly wider than normal-wide category, it's worth mentioning there was also a 127mm (5") version of the Graflex Optar lens, though I've never seen one.
Others may have different requirements in an alternative to a "normal" focal length. The regular normal-long option for 4x5 is 210mm focal length, which is 8-8½" for older lenses. This is ~30% longer than "normal", though an 8½" versus a 150mm (the most extreme comparison) is ~44%. These are fairly common lenses that allow a greater camera-to-subject working distance, and eventually just about everyone who does 4x5 will end up with one.
For a long time, a "portrait" lens was one with roughly double the "normal" focal length -- 85mm for 35mm film, for example. The longer focal length gives a greater, more comfortable, working distance, less depth of field, and a flatter, more pleasing perspective. For 4x5, this would correspond to the focal length of a normal lens for an 8x10, roughly 12-13". However, such a lens would be very big and heavy, and it would unnecessarily cover a huge image circle (>8x10) if taken off an 8x10 and put on a 4x5, so before we get up to that focal length special telephoto designs for the 4x5 format start to become advantageous. These will be more compact, meaning a longer rail or bed for camera focus travel is not needed so much to use it. They are still fairly hefty pieces of glass. The longest lens I have, in fact, is a 270mm (a Tele-Arton), which is only double the focal length of a 135mm normal-wide lens.
The image scale on the film is a function only of the lens's focal length, not the format, so all the problems which arise using 300+ mm lenses with smaller formats, like camera/image stability, apply for LF, too. The only distinction is that the degree of enlargement is less for a given size print for LF, so it is more forgiving in that respect.
I notice somewhat the same thing with depth of field: a normal-wide 135mm lens seems to have a lot of depth of field on the 4x5's ground glass, but with a smaller SLR/DSLR the same focal length lens it seems much smaller.
 While I've mentioned a lens's image circle before, it's worth giving it
some extra elaboration at this point. In a camera where the lens's optical
axis and focal plane are fixed with respect to each other, the lens only
has to have an image circle diameter of good definition sufficient to just
cover the corners of the format. This diameter is equal to the format
diagonal. So, for a "normal" lens with a focal length this same distance,
the image circle diameter is a little less than one radian (53.1°
=2*Tan-1[½], or 92.7% of a radian). Image circle diameters
are usually given in angular units, as seen from the center of the rear of
the lens (technically the 'exit pupil'), or as linear units at the focal
plane.
While I've mentioned a lens's image circle before, it's worth giving it
some extra elaboration at this point. In a camera where the lens's optical
axis and focal plane are fixed with respect to each other, the lens only
has to have an image circle diameter of good definition sufficient to just
cover the corners of the format. This diameter is equal to the format
diagonal. So, for a "normal" lens with a focal length this same distance,
the image circle diameter is a little less than one radian (53.1°
=2*Tan-1[½], or 92.7% of a radian). Image circle diameters
are usually given in angular units, as seen from the center of the rear of
the lens (technically the 'exit pupil'), or as linear units at the focal
plane.
A general principle, we thus see, is that as focal lengths increase, the requisite angular image circle diameter for a given format decreases (to keep the linear diameter the same), while for shorter focal lengths it's the opposite. The practical import of this is that short focal length, wider angle of view lenses are more difficult to design and construct, and generally to come by.
The demands on the lens increase when we can tilt or swing the lens's optical axis relative to the focal plane, or shift either laterally relative to the other. A larger image circle is required than is sufficient to cover just the format corners in a camera where the optical axis intersects the focal plane at the latter's center, where these movements aren't possible.
This gets to an important peculiarity of LF photography: the term 'wide angle' (or 'wide field') may refer to the angular size of the image circle cast by the lens, regardless of its focal length, and doesn't necessarily imply a short focal length for the format or a wide angle of view in object space. The term can refer to the image space side of the lens instead.
As an example, a 12-13" lens of "normal" focal length for 8x10, when used with 4x5 as a "portrait" focal length lens, will have a relatively enormous image circle diameter (~12-13" at least) for the smaller format and might be considered a 'wide angle' lens, even though it is a longer not shorter focal length than "normal". Such a lens would allow very extreme tilts, swings, and/or shifts. This is the main advantage of 'wide angle' lenses in general: they allow a greater range of adjustments before one hits the edge of the image circle. Of course there are always trade-offs. Cost and weight are the main ones. A higher minimum f-stop would be another. The need for a center filter, since the illumination level decreases the further away from the optical axis one gets (per the "cosine to the 4th law") is yet another.
By the principle developed above, shorter focal length lenses are more necessarily also going to be 'wide angle' designs. If the focal length is taken to be equal to the format's maximum horizontal dimension rather than its diagonal, this is ~4¾"=120mm for 4x5, which makes for a good example. For someone using a normal focal length lens of 150mm or 6" who wishes to skip over normal-wide lenses (135mm), it makes a good focal length for modest wide angle work, giving an object space field of view of 43.3° x 53.4°. It is 76mm from the format center to the corner on the film, so a 2*ArcTan(76/120) = 64.7° image circle diameter is needed to just cover the 4x5 format on-axis with this focal length.
In practice, a lens with a coverage at least ~10% more (greater than ~71-72° in this case) is needed to provide even minimal adjustments with a view camera. For 4x5 this corresponds to a linear image circle diameter of ~173mm. Recall that the format diagonal is ~152mm (when 1/8" borders on all four sides are taken, as in a typical film holder), so with this size image circle on-axis the corners of the format are only ~20mm (<1") from the edge of the image in any direction in the corners. When working with the image on the ground glass it's helpful always being conscious of where the edge of the image is.
There are two caveats: first, the corners of the ground glass on many cameras are snipped off, so air can enter and escape the bellows freely to keep the pressure inside and outside the camera equalized as the back and front are moved relative to each other, so you may not be able to see the actual corners of the image. Second, the image coverage figures one might find published somewhere are typically taken at f/22, presumably because they are maxed out by about that f-stop as the lens is stopped down, and determination of where the image "goes bad" may be somewhat subjective, so they may be only indicative of where the image edge seems to be, both for focusing and for other f-stops that may be used for exposures.
Staying with the 120mm focal length and moving to concrete lens examples, a Schneider Symmar S f/5.6 120mm lens, according to one online reference, has an image circle diameter of 173mm (71.6°), while for their Apo Symmar (also f/5.6) the number is 179mm (73.4°). By contrast, both the Schneider Angulon (f/6.8) and Super Symmar HM (f/5.6) lenses are listed at 211mm, which corresponds to a very generous 82.6° field, ten degrees larger. As it turns out, this is just enough to cover the 5x7 format on-axis, which has an ~210mm diagonal. Lenses for use with 5x7 with adjustments have image circle diameters of 290-312mm (100-105°), though they are all f/8 lenses. The higher number (312mm) is just sufficient to about cover an 8x10 on-axis. 120mm is an extremely short focal length for 8x10, corresponding to a very wide angle object space field of view of 78.7° x 91.8°, requiring a lens with a super-wide field on the image side of almost 105° (103½°).
The general principle is that the linear image circle diameter for a lens can tell you what format it is made to be, or can be, used with. For 4x5 this is especially important for focal lengths roughly in the 60mm to 100mm range, as these may be fast, normal-ish focal length lenses made for use with various smaller, medium format cameras, and they may not be capable of covering a 4x5, even without adjustments.
Few commonly available lenses with image circle diameters >105° are made. For example, a 10mm focal length ultra wide angle lens for the APS-C format (27 mm diagonal) needs to have a 107° diameter image circle to cover the format's corners on-axis. To reduce the focal length a little, to 8mm, would require 120° coverage.
The next logical step down in focal length from 120mm would be to take the 4x5 format's minimum dimension rather than its maximum dimension (~120 mm) or diagonal. This is ~3¾", which is roughly 95mm. Perhaps because 4x5 has a relatively small aspect ratio compared to other popular formats (which have 4:3 or 3:2), this got rounded down to 90mm (which is closer to 3½"), though there are also some common older lenses of 4" (100mm) focal length vintage.
Using the same equation as before, it will take a lens with an 81.1° image circle diameter just to cover the 4x5 format on-axis at a 90mm focal length (~75° for 100mm/4") -- the old f/8 Goertz Wide Angle Dagor design (81.8°) would be an example. Something closer to 88-90° is needed in practice to provide for minimal view camera adjustments. Much better are the ultra-wide angle designs, like the Schneider Super Angulon or Rodenstock Grandagon, which will cover at least a 5x7 and are up in the 100°+ image coverage realm.
People often take the very widest angle lens focal length that is practical as corresponding to half the "normal" focal length, or F=75mm for 4x5. It takes a 90° image circle diameter just to cover the corners on-axis. A 100° image circle is only 178mm linearly, so an ultra-wide angle design is mandatory at this short a focal length. At F=65mm (the next step down), a 105° image circle is needed to give ~170mm linearly, so such lenses are the widest made for use with 4x5; they have an object space field of view of 72° x 85 1/3° and can only be used with virtually no swings or tilts.
I'll end this lengthy digression by once again emphasizing the value of using a center filter with lenses that have large angular image diameters. A 105° field diameter means the angle to the edge of the image is 52½°, the cosine of which is 0.61. When taken to the fourth power this means the illumination level at the edge of the image is only 13.7% as bright as on-axis (angle=0°). And this is at best, for an ideal lens. This translates to almost a 3 stop difference (2 6/7), which is a significant amount, especially for higher contrast materials like slide films.
Even in controlled studio situations it is difficult to light things to compensate for this much unevenness. As well, sophisticated digital darkroom programs are generally unable to salvage a scan with this much of an over- or under-exposure in part of the image. And, remember, one usually doesn't even know where the optical axis (center of the image) is on the film to begin with, which is necessary in order to apply any sort of post-exposure radial correction. Simply put, a center filter is almost a vital component of a wide or ultra wide angle lens, which is why in general each lens needs the particular filter which goes with its design. This qualifies center filters as rather specialized equipment, so they are relatively expensive. Be sure to factor their cost into your lens purchasing budget.
As per the above, as it turns out the Schneider center filter I have for my Super Angulon 90mm f/8 lens has a carefully calibrated filter factor of 2 5/6 stops (±1/6th of a stop). However, some center filters for other lenses have manufacturer listed filter factors of only about half as much (~1½ stops), which makes me suspect they are only able to provide partial correction, or represent a compromise because a filter factor much above 1½-2 stops makes a filter much less likely to be used. My 75mm Caltar lens is of a Grandagon design, and the Rodenstock center filter for it is of this type, with a 1½ stop nominal filter factor.
As a final note, realize that you'll most likely want to install the center filter on the lens only after you're done working with the image on the ground glass (which is already dim enough) and are ready to make an exposure. Any subsequent filters one might normally use (like a UV filter) go on the outside of the center filter, and will thus be of very large diameter -- maybe up in the 80mm diameter and above range, though it varies from center filter to center filter. For gel filters, this is larger than the 75mm (3") size can accommodate. Short focal length lenses are commonly mounted in recessed lensboards -- generally the deeper the better -- and the center filter, with its large diameter, may be the limitation in how deep a recess can be used, and it will likely vary a little from camera to camera. You'll want to take this into consideration when choosing or designing and making a recessed lensboard.

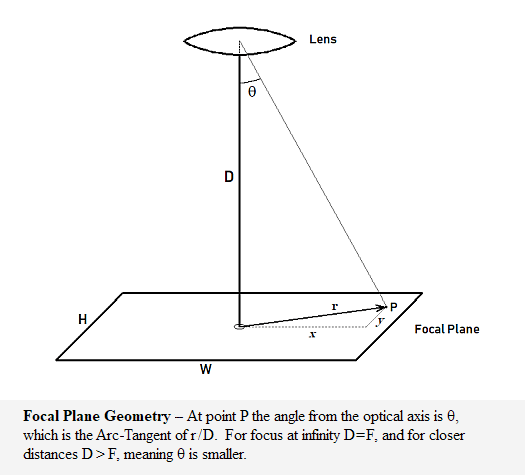
So consider a camera set up on perfectly level ground so it is level horizontally. It has been outfitted with an F=135mm lens and the camera back rotated to vertical or portrait orientation, so the long dimension of the film runs up and down. With the same sort of simple geometry used before, the vertical field of view is 48°, or 24° both above and below the horizontal. If we take the optical axis to be 5 feet above the ground, as would be typical for a comfortable tripod height, then more geometry tells us the point on the ground at the lower edge of the field of view (top of the film or ground glass) will be 11¼ feet away in the horizontal, and 12.3 feet from the camera, line-of-sight. A side view diagram looks like this:
The one exception to this statement would be at the longest exposure times, like ½ or 1 second; some shutters seemed slow, or long, as judged using a stopwatch. But this wasn't exactly a strike against them since reciprocity failure (of the film) would call for a slightly longer exposure anyway. So having a slow shutter at the long exposure times was kind of like having automatic reciprocity correction.
[Reciprocity failure kicks in for regular films at an exposure time of anything longer than about 1/10th second. When the film is very weakly illuminated, which it is when such long exposure times are required, as a storage device the film acts like a leaky bucket, requiring an even longer exposure time to achieve the same equivalent exposure.
From 1/10th sec up to ~1/4th sec, one needs to add only ~¼ to 1/3rd stop more exposure. By a 1 second exposure time it's more like ½ stop, and over the 2 to 4 second range it goes up to about a stop more being necessary. By the time one gets up to a 5 second exposure it takes about a dozen seconds to get a corrected exposure time. At 8 seconds the adjusted exposure time is about 3x longer (25 seconds), beyond which further exposure becomes pretty much futile and you almost can't over-expose. Though films differ, this is typical for consumer films designed for bright light and short exposure use.]
Shutters from about the mid-70s on don't have this "feature" so you have to figure the reciprocity factor into your exposure determination. With the camera on a tripod you'll likely use these shutter speed settings at some point, so they're worth checking. Consistency is the main factor you want, since obviously a shutter which hangs or seems sticky in any way needs service and would be a nightmare to try to use.With this exception, shutters are thus pretty much interchangeable, except that each one seems to have the various controls in a different location, and might attach to its accompanying lens board (to hold it in the camera) in a slightly different way.
Also note that even if the lens threads fit a given shutter, the f-stop numbers may be all wrong if it's the wrong shutter for the lens.
The one unavoidable consequence of the one-shutter-per-lens rule is that of weight: my padded lens case, with seven lenses, filters, lens shades, etc. is quite a load.
Film processing - Hopefully there will remain a small but sufficient market into the future for both 4x5 color slide film (E-6) and the processing it requires that both will remain available. If not, then the fallback will be color negative film, which is about as difficult to process as B&W film is, if the chemicals are available.
While you don't have to be a chemist to process B&W sheet film, there is a learning curve. One first needs to choose whether to use trays, tanks, or a drum to hold the film and its processing chemicals.
Tank development requires hangers to hold the film and is best for batches of at least 6-8 sheets, and likely multiple batches; the smallest tanks are about a half gallon (2 liters), so they use relatively the largest amount of chemicals, which are often re-used and/or replenished to extend their lives.
5x7 trays need about a tenth as much solution (6-7 fl. oz. or ~200 cc's) to give a depth of ~3/8ths of an inch, which is sufficient to cover the film (emulsion up, to prevent scratching).
A small drum needs the least solution -- 2½-3 fl. oz. or ~80-90 cc's -- and is light tight, so the processing only requires enough of a darkroom to load the film into it (which presumably one has to have previously loaded the film into its holders for exposure in the first place), then the processing is done in normal room light.
Small drum users almost always use "one-shot" chemicals, meaning everything is used just once and then discarded, with the possible exception of the fix, because of its typically much higher capacity. Very dilute developer solutions can be at the other extreme, and may not contain enough developing agent to develop a sheet fully without hitting exhaustion with this small amount of solution.
Since tray development uses about twice as much chemistry as a small drum, the solutions may be used more than once, especially (as before) the fix. Most photo chemicals, whether from a recipe in a book or from a 'kit', bottle, or package, will have their capacities somewhere in the specifications; you'll need to figure out how to scale these to the amount of solution you're using, which should always be measured. The more standardized and repeatable you can make things the more consistent your results will be. There's no need for film processing to be hit and miss.
Development times will vary among the three methods because of the difference in the amount of agitation given. This is important because the developer can somewhat or partially exhaust locally, especially in highly exposed areas of the film. Agitation helps move the used up developer molecules out of the film's emulsion and helps them be replaced by fresh ones.
With tank development, the film hangers are usually lifted clear out the tank and tilted slightly so that the solution draining off their bottom and back into the tank does so first from one corner and then from the other. The hangers are then re-immersed, with maybe a short, ½" distance drop at the end to knock any air bubbles off the surface of the film. This whole process takes about 15 seconds to perform, so the agitation cycle is usually once per minute.
Obviously, a clock with a sweep second hand that you can see in the dark but that isn't too bright will be needed. You will need at least a second tank, so that after the development time is up (minus fifteen seconds) you lift the hangers out of the developer, let them drain, and then immerse them in the stop bath, where agitation should be close to constant for at least the first 15-20 seconds. If you can pour out the developer (say, into a bottle), rinse the tank, and fill it to the correct depth with fix, all in the dark, while the film rests in the stop bath, then you don't need a third tank, but most people have them.
With tray development, the agitation rate is higher, and may be more or less constant. There are two techniques: one tilts the tray slightly from corner to corner in a semi-random order so that the solution sloshes around some in the tray, thus keeping it mixed and moving over the surface of the film, while the other approach involves lifting the corner(s) of the film up, either keeping the film below the surface or lifting it out entirely and letting it drain solution back into the tray for several seconds. The one thing one wants to avoid are periodic or patterned flows, or anything that will lead to uneven development. People used to build tray rocking tables, and this approach is the least messy and involves having your hands in the solutions the least amount of time (like almost zero). B&W photo chemicals aren't generally very dangerous to be in skin contact with, but less is better in any event.
Even though it's somewhere between very difficult and impossible to find, I'd recommend starting off with "ortho" B&W film if at all possible if doing tray development. Since this film is not sensitive to red light one can use a red 'safelight' so you can see what you're doing. Learning to load film holders is immensely easier this way, too. I use a 4½ watt red LED bulb behind a 1/8" thick sheet of red plexiglass, the latter being added because the bulb I got at the hardware store -- a Feit Electric model #A19/TR/LED (dimmable) -- emits a tiny amount of yellow light, and even a teensy bit of green light, too, when viewed through a spectroscope. The red plexi, which visually is a deeper red than a #26 Wratten filter but not quite as deep as a #29, knocks out everything shorter in wavelength than ~590-5nm, just to be extra-safe. With experience you can partially gauge the degree of development of the film in real time when using trays of solutions, which can be helpful when trying an entirely new or different developer where only a rough idea of its activity level (speed) may exist.
The one hitch here is that some/most films have some sort of dark 'anti-halation' coating on their backsides. This is to prevent any bright light which totally penetrates the film during exposure without getting absorbed from reflecting off the inside back of the film and causing a second, unwanted ghost exposure. This coating usually dissolves away during development, but there are pre-development baths which perform this function alone; they are obscure, but a decent book on photo chemistry should have a recipe (formula). It is obviously easier to consistently judge the amount of development with the anti-halation coating gone, especially early on during development, and it can be worth the extra, fourth chemical bath. Be sure to rinse/wash the film well after treatment so there's no carry-over of chemicals into the developer.
Drum development has the highest level of agitation, since it's basically constant, as the drum is constantly rolled back and forth, moving the film through the solution, which sits in the bottom of the drum. One generally wants a fairly slow rolling rate, else the flow of chemicals back and forth in one direction will cause streaks which will be most evident in uniformly exposed areas on the film, like expanses of clear blue sky.
So that the solution can flow over both sides of the film, a drum with ribs on its inside is highly preferable; these are very small, maybe only 1/16" or less, spacers. While I think these were originally added to the design to help keep the solution mixed during use, without them the film may stick to the inside of the drum, preventing any anti-halation backing from being completely removed. Even worse, it may also be very difficult to remove the film from the drum when processing is finished.
One other thing to know about drums is that they don't drain completely, meaning you have to guard against chemical carry-over by perhaps adding rinse/wash steps into your process, which adds time. A simple experiment is to pour 100 cc's of water into a dry drum, and then see how much you get when you pour it out through its light tight lid as if you were processing a sheet of film. You will usually 'lose' at least 5 cc's, which is 5%. It remains in the drum, scattered around as droplets on all the surfaces, possibly contaminating whatever you put into the drum next. Even with the one-shot use of chemicals this is probably undesirable, so a 30 second or 1 minute water rinse will remove it from the drum -- or at least replace it with nearly all water.
I don't use a rinse/wash step between developer and stop bath, since I don't save the latter, but I use two between stop and fix since acid carryover into the fix is a big no-no, especially with a simple fix that is nothing but sodium thiosulfate. I use a two-bath fix strategy (which should be mentioned in that decent photo chemistry book), and I also use a 'hypo clearing agent' (to remove the fix remaining in the emulsion, which greatly hastens washing times), and since these baths are all re-used multiple times a rinse/wash step inbetween is crucial to both their longevity and their operating correctly. It is better for them to be gradually diluted w/water than with chemical solution from the previous step. Even with the constant agitation a drum provides, you almost can't over-wash a sheet of film at the end of the process, so be sure to use at least four or five changes of wash water.
A final treatment with a wetting agent ("soap suds without the soap" -- Kodak's Photo-Flo was the standard for a long time) will help the film drain quickly and evenly when you take it out of the drum and hang it up to dry. It may be easier to do this last treatment in a separate tray rather than in the drum. You can hang up the film to dry with just a clothespin and some string, but you want it to be in a location which is calm and dust-free. Allow at least 15 minutes and probably more like 30 minutes or an hour.
The Exposure Record: Keeping track of what you're doing is crucial to making experiments useful, because you'll quickly forget the many little decisions you make in getting set up to expose a sheet of film.
Ansel Adams briefly published a handy little notebook full of 5½" x 8½" (half page) sheets with sixteen lines per sheet under a header block -- sheet number, film type, size, date loaded and date exposed.
Each line, going left to right, had a subject field, and then a place to put meter readings into their desired exposure zones, followed by the remaining variables needed to come up with an exposure setting, in several blocks: the film speed; the lens focal length, extension, and any extension factor; any filter and its filter factor. The final three columns were the f/stop, exposure, and intended development (Normal, Normal-Minus, Normal-Plus, etc.).
As this was designed by someone using B&W film, the amount of development intended would depend on the placement of various objects on the exposure scale and where one wanted them to end up in the negative; for color film this is always going to be a non-variable (which equates to "Normal", you hope) unless you're doing your own color processing, though what was called "push processing" -- a longer first development -- was effectively Normal-Plus, though it was advertised as increasing the film's speed, since your exposure would essentially be what you'd get if you pretended the film's speed was higher, typically by one stop (a factor of two).
On the back of each sheet there was also a line for each of the sixteen exposures, with a column on the far right. These were unlabelled, so you could use them for whatever you wanted. I would typically record all my meter readings in the main field, or anything else relevant, like "light very variable". After development, I'd use the righthand column for a sequence number, which would also go on the sleeve holding the finished negative or slide -- I used plain numbers for B&W negatives, and two letters for color slides (like #KE); since there are 26 letters in the alphabet this goes up to 262 = 676 exposures before you need to add a third letter, which would take you up to 17,500+.
There were several problems with this structure that I'd change. I wouldn't typically shoot all my film in batches of sixteen on the same day, so it needed a column for the date on which each sheet was shot; I used the lefthand margin for this, blocking off each "shoot" by date (and perhaps a location identifier also) with a short horizontal line. There was also the problem of shooting a mixture of different kinds of film, so a column was needed for that, though the film speed column was something of a proxy since it was almost always different for different kinds of film. In tracking down problems with film holders (like light leaks) I found it helpful to keep track of which numbered holder a given sheet was exposed in, so that was another needed column. If you're mixing exposures that will require differing amounts of development you'll initially want to know which holders "go together" -- for example, those that hold all the sheets that you want to give, say Normal-Minus development to.
>> Page Still Under Construction <<
For those interested in the technology, the scanner was essentially a microscope, with the plate attached to an X/Y stage driven by stepper motors. At the end of each scan line the motors had to be ramped down in speed, and the plate stopped before being ramped up in the reverse direction to do the next line. One could control both the distances and velocities involved. While it was possible to shake a plate loose by making things go too fast, it optimally took on the order of ~10 hours to scan a whole plate. The detector was a PMT (photo-multiplier tube), amplified and fed into a 10-bit A/D convertor. The electronics has a certain response time, and the PMT sees a rather dim signal in the high density areas of the plate, so sampling at only kilo-pixel per second rates was necessary to give a good S/N, beyond which going slower didn't provide much benefit. So each line of a postage-stamp sized piece would take about a second, and each piece on the order of eight or ten minutes; at about six per hour, a plate broken up into fifty such pieces would take about eight hours to scan completely. The scanner was not light tight and lived in its own darkened small room. The dedicated computer was a PDP-11 running a command line "OS" known as PIP (Peripheral Interface something). While there were two terminals, you could not use the second one when a scan was going. The same computer was used for processing the scans, via compiled FORTRAN code. Programs tended to do only one or a few operations on an image at once. Only very small (like 64x64 or maybe 128x128) images, or extracted sub-images, could be read in into programs in their entirety all at once. Otherwise one had to shuffle some smaller number of longer lines in and out. Some operations that are very computationally intensive, like median smoothing, which was used to measure the reference background empty sky level, were done on "skeleton-ized" versions of the original scan where, say, every tenth pixel from every tenth line was lifted out for processing, to gain a 100x speed advantage -- since resolution can be sacrificed in this instance, the density level not changing over distances on the order of ½-1mm.
The very earliest emulsions were not very fast and so they were developed just to, or almost to, completion in very active, high pH, sodium carbonate (or stronger) developers. Development can be looked at as an amplification process, and by cranking it up to a practical maximum one got contrasty negatives with what would be a high maximum density by later standards. This was especially the case with films which would be reversal processed for direct viewing or projection, into either B&W or color slides, where maximum densities >3.0 give the best results. As films got better, developers became less active ("gentler"), but the custom of developing negatives to rather high maximum densities (above 2.0, and perhaps closer to Dmax = 2½-3) persisted, especially in commercial and graphics arts applications.
Such high densities created a problem when these negatives were enlarged: the higher the maximum density, the dimmer the image on the print paper. One either requires a higher intensity light source in the enlarger, or a faster enlarger lens, or a longer exposure time, or faster print paper. All these are costs of some sort, so as machine processing and printing became the norm for mass consumer small-format photography during the `60s it became clear that printer throughput could be increased by about an order of magnitude if negatives were given less exposure and development, and their maximum density reduced by about 1 or a little more.
Enter the era of the thin, flat negative, with a maximum density of 1 1/4 or 1½. Such a negative is given the minimum amount of exposure necessary, which translates into the film being rated at a high speed, and the exposure is then given minimally sufficient development. Such a negative can print well on a high contrast paper developed just to, or almost to, completion in a very active, high pH, sodium carbonate (or stronger) fast developer.
It's important to realize this is the kind of negative portrayed in the generic characteristic curves shown in this section of the O-18 publication. Almost all the available headroom, both in exposure and development, on one side of the equation, has been pretty much used up. One could say it has much greater tolerance for over-exposure and/or over-development than it does to their opposites. Another way of saying this is that one is always in danger of under-exposing and under-developing following the film speed and development time recommendations Kodak was putting out then. When in doubt, give more exposure and development if you want to shave things in what is likely to be the safe direction.
Also keep in mind that this type of negative, it can be argued, is obsolete if one is going to scan and digitize it rather than make an old-fashioned silver print from it. This is because scanners are designed to be able to handle slides, with their high maximum densities, so there is no reason not to make negatives which are better matched to the available density dynamic range, negatives with Dmax more up in the 2+ to 2½ range, as before. By the older standards such a negative is given both very ample exposure -- perhaps a stop or more than is suggested by its rated speed -- and is then given rather full development. You've paid for the silver to be there in the emulsion, why not use it rather than dissolve it away in the fixer and then pour it down the drain?
©2015-19, Chris Wetherill. All rights reserved. Display here does NOT constitute or imply permission to store, copy, republish, or redistribute my work in any manner for any purpose without prior permission.

Your support motivates me to add diagrams and illustrations! Darkening Blue Skies in B&W Photography
How Far Is Infinity?
