If you do a web search on this term you'll quickly find all the info you need (but not much theory) at AstroJargon.net, including a nifty mask generator, which is what I used (v0.4). Making a mask was easy, though there was a little bit of a learning curve.
The mask generator app makes a ".svg" file, which I'd never encountered before. These Scalable Vector Graphics files turned out to be readable directly into Windows I-Net Explorer 11. They were then saved out as .PNG files, by placing the cursor over them, right clicking, and then selecting "Save picture as...". This is where you have to change the file type (.BMP is a third possibility) before actually saving.
I then read the .PNG file, which is by default a file 32 bits in depth and was only 428 x 428 pixels in size -- and this doesn't change if you zoom in or out in I-Net Explorer -- into a generic image processing program made to handle greyscale (8 bit) or color (24 bit) pictures, but which can nevertheless read these files in as if they were the latter. I then increased its size ~4x, while also reducing the bit depth to only 4. Even though the mask is basically black or white (only 1 bit) in theory, the original had 27 different shades of grey, and after enlargement it was deemed sufficient to maintain the mask's quality by keeping 16 different levels (4 bits), including black and white.
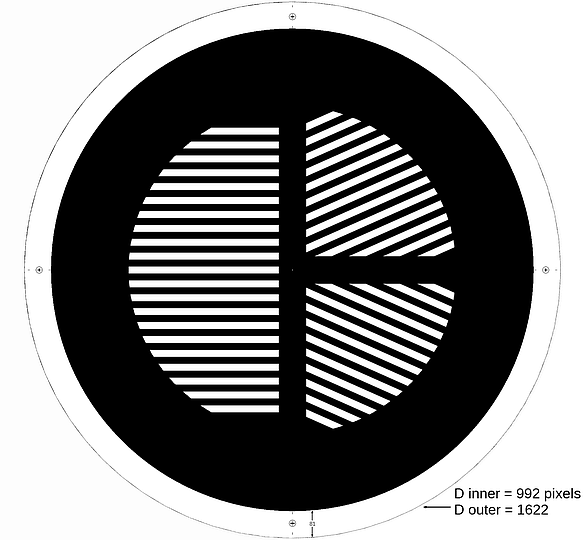
I wanted a mask which would fit on my F=135mm f/2 lens with its lenshood attached, so I designed a mask with a full aperture, 67½ mm diameter. The active area of the enlarged mask has a diameter of 976 pixels, so it then required a print resolution of ~375 DPI (dots per inch) to give the right physical size when printed. [375 = 976 × 25.4 / 67½mm] The extra outer area of the mask is more, to accomodate the lenshood and a simple mounting frame so it slips on over the lens with the hood on. [The numbers in the mask shown below are a little different than these because it was made for an F=85mm f/1.8 lens.]
I printed the mask on my cheapo B&W laserjet printer, using plastic I had which was originally made for making transparencies on a regular office copy machine, like for use with an old-fashioned, pre-PowerPoint, overhead projector. Any bigbox office supply store should have something like this for whatever printer you have. Luckily, the laserjet toner stuck to the plastic well, so I was in biz without much hassle.
The only drawback with this approach is you're limited in size to ~8". (-though I suppose you might be able to make two halves on separate sheets and get up to ~16" in diameter.) If you need a bigger mask and you're in a big enough city I'd suggest trying to find the businesses that do blueprints and other similar kinds of work for architects; they may have the ability to print on bigger sizes of plastic, or know someone who can.
Anyway, by transmitted light the black I printed doesn't look very black, and the plastic isn't as transparent as glass or "optical plastic" in the clear areas, so the mask is fairly crude, but it works well enough.
There are two ways to increase the density of the black areas, neither of which I've tried. One would be to go in and hand color it with a black pen and a ruler, to darken the black areas. The other approach would be to run it through the printer again. But I don't have a large supply of the particular stock of plastic and have had spotty to no luck getting acceptable registration of the two printings when trying this sort of thing under other circumstances with plain paper; even with manual sheet feed the paper doesn't quite go through in exactly the same position each time. I already had the printer settings set to give as dark a printing as possible, and they look pretty dark when printed onto paper. So rather than try and improve the mask I just went with what I had.
The mask was cut out as a circular disk and mounted in a simple frame made from 0.20" thick gatorboard -- a heavy-duty, much stiffer variety of foamcore board. Because the mask pattern consists of two halves, its possible to support the flimsy plastic the mask is made of from behind, so it doesn't sag too much, with a piece that spans the diameter. The mask is then held to the frame with a retaining ring. This sandwiches the mask down to the frame with small machine screws. Gatorboard takes wood glue, which seals exposed, cut surfaces well, so it can be tapped for thread if the holes drilled in it are filled with glue and then re-drilled after the glue dries. (I suppose you could also use expoxy.) The whole idea behind making a frame was so that different masks could be swapped in and out easily, since I thought my initial mask could probably be improved on after trying it out. To this end I added the location of the four screw holes to the mask pattern, since the plastic the mask is made of also needs to have holes drilled in it.
The final mask looks like this:
Note: The January, 2020, issue of Sky & Telescope magazine has an article on Bahtinov masks, page 30, which doesn't overlap with any of the above. The authors there use a mesh material to construct what might be called a v.2 mask.