
Even though my dad had an old, classic Weston handheld light meter when I got started in photography as a teenager, my first cameras had built-in light meters so I never really used it. It wasn't until I got into large format photography and the Zone System that I understood the need for a light meter separate from the camera, and one that could read small areas of the scene being photographed.
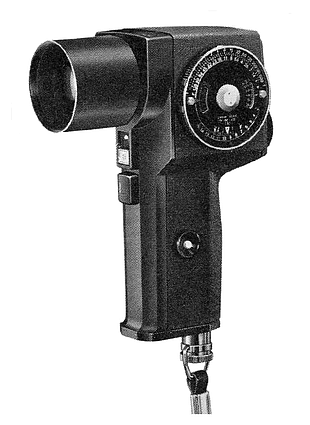
The Pentax Spotmeter 1°/21° was the meter of choice in this area then (c.1975), and I was able to get one. It first came out, according to one source I've seen, as the Asahi Spotmeter in 1968, and I guess Pentax bought them and started making the meters a few years later. My lens cap has both the Asahi and Pentax names on it. On the other hand, I've seen an online PDF manual for the meter put out by Honeywell and with the name Honeywell Pentax. There's no date on the manual, but the pictures of the unit look exactly like mine. To confuse things even more, Honeywell put out a "Guide to Good Exposure" booklet in 1966 that basically explains how to use the same meter. So maybe Honeywell came up with it first. Who knows?... Anyway, after years of use I never felt any need to get (or even try) another meter. It was that good a light meter.
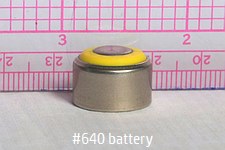
Unfortunately, my still functioning unit was obsoleted early in the new millenium by changes in battery technology, specifically the discontinuance of the 1.35V #640 button cell battery it used, which powered the meter in bright light (upper scale). This battery was based on mercury chemisty, so I guess it had to go. A standard 9V "transistor radio" battery powered the lower, dim light scale, and these of course are still being made. Maybe the most peculiar thing about the meter's design in retrospect was that it used two entirely different batteries.
The other peculiar thing was that there was no ON/OFF switch, so the unit was always "hot" and ready to go. Just remove the lens cap and make a reading. This worked because the CdS photocell operates as a photoresistor, and in darkness it has a high resistance (like a megaohm or more) so there was very little current flowing in the meter's circuitry and no drain on the battery. The low light scale (and 9V battery) was activated by squeezing the trigger button conveniently placed at the top front of the handgrip.
The front barrel contained something like a 75mm f/2 lens, so the meter had a little bit of light gathering power and gave a bright image even in dimmer light. A 45° angle mirror in the converging beam directed the image down through a piece of glass with the two light level scales and the 1° diameter circle (the spot being measured) painted on it, towards another 45° angle mirror which directed the light out to the eyepiece in the back (-barely visible in the photo at right). One got a modest telephoto magnification (~2-3x) and a field of view of 12°x17°. The 21° figure refers to the diagonal.
Both battery compartments were in the base, with the button cell going inside the hinged door that had to be opened to get to the 9V battery. For this door to open all the way the hand strap had to be unscrewed and removed first.
The other things you see in the picture includes a little white button on the side of the handgrip; when pushed this turned on a little light that illuminated the scales. It had to be really dark to need this, so it was basically superfluous. I only used mine once or twice before either the bulb or the circuit that powered it failed.
Higher up on the same side was the exposure calculator dial, where you'd set the film speed, dial in the meter reading you'd just gotten, and then it would give you all the indicated shutter speed and f-stop combinations from about f/1 to f/128.
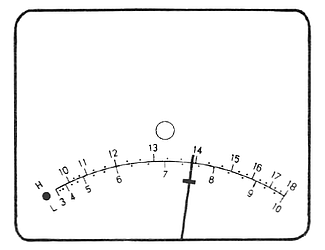
Above the trigger button for the low light level scale is a grey button which one could depress to check the 9V battery, via a mark visible in the viewfinder. In fact, the "screenshot" of the meter's scale (at right) shows it during such a battery test; the mark is below the numerical scale.
You can also see the 1° diameter spot that the meter is reading and the two analog scales, for low (L) light and high (H) light. The twelve stop range from 3 up to 18 represents a range of 4096x. What's sometimes called a "Standard-16" exposure level, for daylight in full sun (f/16 at 1/Film Speed), corresponds to a reading of 14 2/3. This would be the same as a reading off an 18% grey card should give in regular full sun daylight. Bright objects, such as white sunlit clouds or snow are going to read 17 or a little higher. Shadows in sunlit scenes are typically going to read 11 to 13 depending on how deep they are, with darker objects within them (like pine trees) are going to be a stop lower.
The final thing on the meter is just above the grey battery test button: a small screw with a very fine slot in its head for zero-adjust. Because of the 45° diagonal mirror, the meter needle swings in a horizontal plane so it is unaffected by gravity or by pointing the meter up or down so long as it is level right-left. With the #640 battery out of the unit, the screw is turned until the needle is centered on the black dot at the far left end of the scale; the screw is connected to a "trim pot" -- a variable resistor -- in the high light level circuit.
©2015-19, Chris Wetherill. All rights reserved. Display here does NOT constitute or imply permission to store, copy, republish, or redistribute my work in any manner for any purpose without prior permission.
Your support motivates me to add diagrams and illustrations!
